Showing posts with label accessory. Show all posts

Tuesday, February 1, 2011

Anniversary/Sweet Valentine Giveaway!


last Saturday was our 5th (married) anniversary.
we didn't do too much, but had rather a relaxing day.


I got him a small gift, and he took me out for dinner @ Pok Pok, Thai restaurant, on Division 
since he 'looked bad'(so he says) having not prepared me a gift.
also took an offer on baby sitting from our housemate, and went out for a drink after our little one went to bed.
we had never really gone out just two of us since this girl was born,
but it is nice to be able to do that every once in a while!


anyhow,,,
I decided to have a giveaway for this occasion, 
combined with an upcoming cerebration of love event, Valentine's day!
-SWEET VALENTINE GIVEAWAY-
here is the prize
-earring/necklace traveling case-
nice to keep your earrings and necklaces from getting tangled and damaged, don't you think?
this little pouch will help you a big time!
so convenient for traveling, or carry a 'backup' jewelry in your bag,
or just for daily uses! 

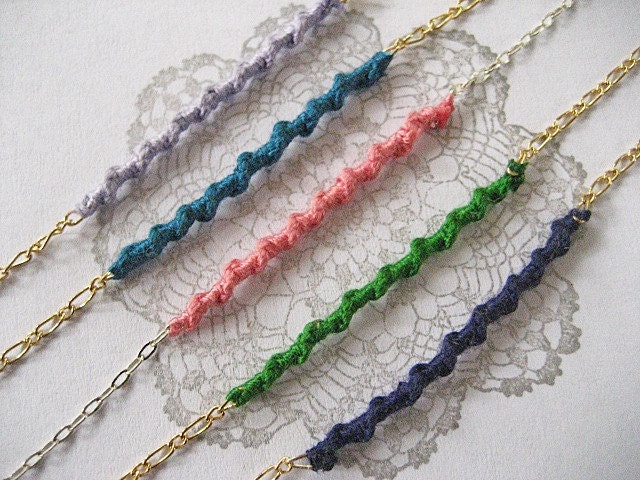
Knotted Bracelet
-knotted bracelet-
you even get to pick a color!
please pick one of the colors from the above right picture, and state in your comment.
for more details about the bracelet, please visit my etsy shop!

******************************************how it works******************************************
please leave a comment with your e-mail address(if I can't reach you via blogger account),
also with your choice of color for the bracelet.
★bonus entry 1- if you follow my blog, you may leave another comment for an extra entry!
★bonus entry 2 -if you follow me on Twitter, you will also get another entry!! please leave a separate comment.
(up to THREE entries per person!!)
this giveaway ends @ FEB 12th, 11:59pm pacific time.
*********************************************************************************************
GOOD LUCK :)!


P.S. a little apology...
I have so much to blog, but since we only have one computer and my hubby has been using it a lot lately for  work, I have not been able to update it often...
I am little behind, but I will find a time and post more!

Thursday, December 16, 2010

how-to -passport case-

okay, finally I am getting the how-to together!  
hope you like it and try making it.
it's a perfect gift for your world traveling friend, and easy enough to make it as a last minute gift :)
I apologize beforehand for the quality of the photos...
the day I was working on it was really dark, typical raining portland weather,
and the lighting of the room I was in wasn't the best...
I photoshopped them, but still not the best...  soryyyyy :(


anyhow, here it goes!

-PASSPORT CASE- 
 *material list*
1. 10 3/4" x 23 1/4"
2. 10 3/4" x 11 1/4"
3. 10 3/4" x 5 1/4" [x2]
4. 9" x 6"
(draw a curve in 1.5" x 1.5" on the upper right corner)
5. 5 1/4"(left side) x 6"(bottom) x 8 1/2"(right side)
6. 3 1/4" x 6 [x2]
7. 1 5/8" x 8"
bias tape
thin infusible interface that is slightly smaller than   piece2 & piece4
                                                                                    Velcro
                                                                                    *sewing allowance 1/2"


-BODY-
use iron-infusible interface and put piece1 and piece2 together.

****************************************
I sewed the edges of piece1 here, but DO NOT sew them right at this step.  
****************************************


infuse piece3 onto piece1, right beside piece2.

now, including the interface edge double fold the side edges of piece1, and sew them.


-POCKETS-
fold the upper edges of piece5&6 twice, and sew.
fold the bottom edge of upper piece6 and pin onto piece5.  sew the lower piece6 on piece5.  you don't need to fold the bottom edge of this lower piece because it will be covered with bias tape and won't show in the end.
infuse the thinner interface onto the back of piece4.

this step is a prep in order to sew a nice curved line.  
just like when you gather, sew the curved edge with wider stitch, and do this twice. 
pull the bottom(bobbin) threads and gather.
try to make a nice smooth curve.
iron, double-fold, then iron again. 
(if you'd like a more detailed version, visit here at Burdastyle)
sew the entire curved edge.
I did double stitch, but it's not necessary. 
just for the looks. 


-CONSTRUCTION-
now, all the pockets are done, this is how it looks all the parts laying together.
piece1 is folded to the center, piece4 is on the left, and piece5&6 are on the right.

****************************************
the picture shows the body is folded, but it is not when working.  lay the piece flat/unfolded, when following the next few steps.
****************************************
fold the inner side edge of piece5&6 pocket once and sew it onto the body.
sew the side and bottom seam of piece4 and body together, as well. 


 sew piece7 into a tube, and make a strap.
turn inside out and sew velcro on it as well as onto the body.
sew the strap onto the right side of the body.  make sure it lines with the other side of velcro.


-FINISHING UP-
sorry, no photo for this step...
I made my own bias tape using a bias-tape-maker(tutorial on Burdastyle), but obviously you don't need to!
but basically all you have left to do is bind the entire body+pockets with bias tape!
the following youtube videos are helpful : no swearing bias tape method
                                                              how to sew binding with mitered corners


tadaaaaa!  all done and well done!!


*please let me know, if anything is unclear to you, or if you have a further question!!


Monday, November 15, 2010

ready for the trip!

here is a digest of what I've been making for the trip.

start with a passport/ticket holder


I had one from a travel company, but it was cheaply made not-so-good-looking one.
so decided to make up one!
the pattern is based on the 'original' one I had.
it has two big pockets, a pouch to put your passports, a slit for your tickets, and two more small pockets.
made with Echino fabric that had been hibernating in my fabric bin for a quite sometime. 
this blight purple will make it easier to see when you have tons of stuff in your traveling bag :)
(especially you have a toddler to travel with!)


next!
knitting needle case
because I can't really take my sewing machines with me on this trip,
I am planning to knit when I have free time in Japan.
I've been knitting a quite bit more than the last year,
and started accumulating knitting needles.
they deserve a proper home anyway.
this way, they are very organised and easier to travel with!
I used this tutorial, but you also can find a lot more here. 


next!
zipper pouches
 
originally made one for my ergo,
then realized they were very handy and made some more for other things!
one of them became a diaper bag, which keeps the bigger diaper bag organized 
and you can just take this smaller diaper bag out when you take the little one to a washroom.
the very big black one is used for my knitting stuff, just big enough for a few rolls of yarn and the needle case.
two more, and I think I am going to use them for socks/underwear, etc...


and the last!
traveler's jewelry case

ever since I saw this creation on Burdastyle,
I had been wanting to make myself one!
it is so handy when you travel and it keeps earrings and necklaces from getting tangled!
I often have a problem(even at home) with that and end up spending 15-20min to unravel the mess.
ha! finally!!
this will make my life so much easier!!


phew!
what a week of sewing!!
I got so much stuff done and am ready to travel!!!!!
well, I guess it's time to pack up then :)


*********************************************************************************
P.S. is anyone interested in a how-to on any of the projects above?
maybe I can put it together when I have time?? ;)
*********************************************************************************