Showing posts with label how-to. Show all posts

Thursday, December 16, 2010

how-to -passport case-

okay, finally I am getting the how-to together!  
hope you like it and try making it.
it's a perfect gift for your world traveling friend, and easy enough to make it as a last minute gift :)
I apologize beforehand for the quality of the photos...
the day I was working on it was really dark, typical raining portland weather,
and the lighting of the room I was in wasn't the best...
I photoshopped them, but still not the best...  soryyyyy :(


anyhow, here it goes!

-PASSPORT CASE- 
 *material list*
1. 10 3/4" x 23 1/4"
2. 10 3/4" x 11 1/4"
3. 10 3/4" x 5 1/4" [x2]
4. 9" x 6"
(draw a curve in 1.5" x 1.5" on the upper right corner)
5. 5 1/4"(left side) x 6"(bottom) x 8 1/2"(right side)
6. 3 1/4" x 6 [x2]
7. 1 5/8" x 8"
bias tape
thin infusible interface that is slightly smaller than   piece2 & piece4
                                                                                    Velcro
                                                                                    *sewing allowance 1/2"


-BODY-
use iron-infusible interface and put piece1 and piece2 together.

****************************************
I sewed the edges of piece1 here, but DO NOT sew them right at this step.  
****************************************


infuse piece3 onto piece1, right beside piece2.

now, including the interface edge double fold the side edges of piece1, and sew them.


-POCKETS-
fold the upper edges of piece5&6 twice, and sew.
fold the bottom edge of upper piece6 and pin onto piece5.  sew the lower piece6 on piece5.  you don't need to fold the bottom edge of this lower piece because it will be covered with bias tape and won't show in the end.
infuse the thinner interface onto the back of piece4.

this step is a prep in order to sew a nice curved line.  
just like when you gather, sew the curved edge with wider stitch, and do this twice. 
pull the bottom(bobbin) threads and gather.
try to make a nice smooth curve.
iron, double-fold, then iron again. 
(if you'd like a more detailed version, visit here at Burdastyle)
sew the entire curved edge.
I did double stitch, but it's not necessary. 
just for the looks. 


-CONSTRUCTION-
now, all the pockets are done, this is how it looks all the parts laying together.
piece1 is folded to the center, piece4 is on the left, and piece5&6 are on the right.

****************************************
the picture shows the body is folded, but it is not when working.  lay the piece flat/unfolded, when following the next few steps.
****************************************
fold the inner side edge of piece5&6 pocket once and sew it onto the body.
sew the side and bottom seam of piece4 and body together, as well. 


 sew piece7 into a tube, and make a strap.
turn inside out and sew velcro on it as well as onto the body.
sew the strap onto the right side of the body.  make sure it lines with the other side of velcro.


-FINISHING UP-
sorry, no photo for this step...
I made my own bias tape using a bias-tape-maker(tutorial on Burdastyle), but obviously you don't need to!
but basically all you have left to do is bind the entire body+pockets with bias tape!
the following youtube videos are helpful : no swearing bias tape method
                                                              how to sew binding with mitered corners


tadaaaaa!  all done and well done!!


*please let me know, if anything is unclear to you, or if you have a further question!!


Sunday, September 12, 2010

old T-shirt cushion covers


my husband loves T-shirt from Granif, a Japanese T-shirt company.
every time we go back there to visit my family, he brings back a couple of their T-shirts with him.
they have a lot of cool designs, and it's perfect for my husband who doesn't like words/writing on clothes. 

over a few years of being well loved/worn by him, and being washed and dried in the machines,
they are no longer the right size/shape for this very picky man.
so he passed these down to me to give them a new life.
 I decided to make our little cushions covers.
they have been naked for a long time, well as long as I've know them.
that is kind of gross...

it was about the time and a perfect opportunity :)

How-To 
[[Turn your old T-shirt in to a cushion cover]]


you'd want to use as much material out of the T-shirt as possible.  
cut the sides as closest as the sleeve seams. and it is okay to go over the seams as long as it is going to be the seam allowance (it will be hidden!)


also, cut off the neck/shoulder part.  you can get more out of the back, because the neckline is higher.

cut the front part into a square, the back into halves.


I sewn a piece of twill tape on the back edges, which make the opening where cushion goes in and out.  this way the opening won't be stretched out and look sloppy...
put all three pieces facing the right side together and sew/serge all four seams.  make sure the outer side of the two back pieces lays in the middle of the three when inside out.  

turn it right side out and put cushion in from the back opening!


taddaaa!

    these even had a nice designs on the back of the shirt, 
which I collaborated into the back opening. 


Friday, October 23, 2009

how-to -hammered hoop earrings-

okay, here is the how-to I had been meaning to post!

-hammered hoop earrings-


here are the tools you need for this project.
in addition to the basic wirework tools, you need a chasing hammer, bench block and flat micro file.
you also see a piece of gold fill wire in the pic.
I used 18 gauze, soft wire.
some people find the 18 gauze wire hurt their pierced ears, so if that is the case, use 20 gauge.


measure the circumference using a tape measure.
here, I used a round nail polish bottle.
and I will be wrapping the wire around it to make a perfect circle.
you can use anything round(and relatively hard) depending on how big you'd like to make your hoop.
it measures 3.5", so I cut the wire 4.5" to have some extra to work with.


make a simple loop on one end.


then wrap it around the nail polish bottle to make a nice hoop.


then bend the other end, and clip off the excess.


it should look like this.


using a flat micro file, round the sharp edge of the bent end.
this will go through your ear, so be extra cautious there is no sharp/rough spot.


set the hoop on a bench block, and use the flat side of the head,
hammer the hoop until it is slightly flattened.

you don't need to make it completely flat,
because we'll give it some texture in the next step.

this is how it looks after flattened.
you see I banged more on the bottom middle part.
this will give the hoop a look that has more weight on the bottom.


now, use the other end of the head, hammer the hoop to give it texture.

just like step ⑥ focus more on the bottom middle part.


repeat ②~⑦ to make another hoop.
taddaaaaa~!
now you have a pair of simple yet gorgeous hoop earrings added to your wardrobe :)


p.s. have a lovely weekend :)

Monday, September 14, 2009

how-to - knotted bracelet

okay, here is the how-to I promised.

these are the things you need in addition to the tools we used in basic wirewrapping.

embroidery threads
chain
fish line or some kind of thread that is stiff but flexible(not in the pic)
clear nail polish(not in the pic)
clasp(not in the pic)
wire/jump ring(not in the pic)


①cut the embroidery thread in 50cm(~20inch)

and fold it at 12cm(~5inch) from one end - this is the base core end


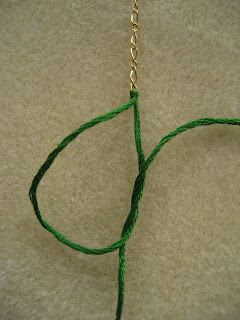
②using a piece of fish line as a needle, thread it through a link of chain
and tie a lark's head knot: bring both ends through the loop
now, the thread is attached to the chain!


③vertical halt hitch

keep the base core end straight,
and bring the working end over then loop it around and back under the core end

this simple knot will form a spiral pattern
continue knotting until it reaches the length you wish
- I made this one 4cm(1.6inch) long, total length of 16.8cm(6.6inch)


④tie a lark's head knot with the core end onto the other end of chain

then tie a square knot
and seal the knot with a dab of clear nail polish
*do not use crazy glue, it tends to dry out the thread/cord


⑤put a clasp on the end of the chain to finish it off
- either wirewrap(simple loop & wrapped loop or use jumpring(o-shaped ring with a opening)

tadaaaaaaa!

in less than a half an hour,
you'll have this cute bracelet on your wrist :)
make them in different colors and have fun!